Showing posts with label Crafts. Show all posts

Sunday, July 19, 2015

My New Scrapbook Room--MEEP!

Moving into our new home, one of my requirements was a space big enough for all my crafting supplies.  My old scrapbook room was much bigger, and all my hodge podge of furniture would not fit in the new space.  Trying to figure that out what would work was very frustrating!  John decided to  suprise me with custom cupboards!  Well, we didn't have them built, but bought pre-mades from Sutherlands--and they were even on sale! SCORE!  In doing so, Megan, a cabinet employee at Sutherlands, plugged our dimensions into her computer, and helped us find out what exactly we needed to purchase that would work for me.  It was fun!  We had the plans drawn up on August 12th. Here are our plans...and I couldn't get the pictures to rotate, so turn your head!
and now the other way...
I decided on the unfinished cabinets since I wasn't fond of any of the pre-painted ones they had in the store. I had to paint them myself and was excited for the project. We bought a cabinet kit when we purchased the cabinets, and off I went! 
It took quite a while to get all the cabinets painted as it was a several layer process, but I finished painting them on August 22nd.
I loved seeing how the counter top I picked out looked with the finish of the cabinets.  It looks so good!  Getting the counter top hooked together and turned the right direction inside the little room was quite a feat.  We had to bring the counter top in through the window!

John and his brother-in-law, Wayne, got the cupboards and  counter top installed on August 23rd.
This tall pantry cupboard was suppose to be at the end of the cupboards by the closet.  When moving around the cupboards as I was painting them, we found that it fit right underneath the ductwork by the door.  It almost looks like it was made to go there.  We decided to change the configuration of the cabinets a little bit and leave it there. I am so happy we did!  This cupboard would have blocked part of the closet and made getting into that side difficult.  It was a happy discovery. :)
This is my room with the install complete.  We put in a dark laminate flooring and it all looks so good together. Yea!!  So happy with how it turned out!  Just a couple of things left to finish.  I have to paint the kick plates for the bottom of the cupboards and we need to get a skin for the side of the cabinet where the pantry was suppose to go. It also needs to be painted. At least now I can begin to unpack boxes and find a place for all my craft supplies.  

Tuesday, December 13, 2011

Pilgrims

These are my newest creations from the Wood Connection.  I think I want to try making them smaller for my Melon Days booth next year.  I'm trying to find things that won't be so labor and time intensive.  I think these fall under that category. :)  I got them finished just in time for Thanksgiving! :)

Turkey

Boy Pilgrim

Girl Pilgrim

Indian

Friday, December 9, 2011

3rd Grade Halloween Party

I was in charge of the juice boxes.  I saw these on Blue Cricket Design's blog, and couldn't resist. :) he he
Yes, they were a hit! :)

Wednesday, November 16, 2011

Emery County Fair

I had forgotten about this.  This summer there were a couple of nice ladies from the other side of the county that came to Green River to do a 4-H club.  They met at the city park once a week, I think.  Morgan, Ian and Zander participated in the club.  They asked if anyone wanted to enter their things into the county fair, and Morgan decided she did.  This is her rock necklace that they made.  They wired them together and painted them.  Morgan was sure excited to get her necklace back with a ribbon! :)

Chore Charts

I've been wanting a new system for the kids to help them remember to do their chores without being asked a hundred and one times. Plus, I had this empty weird little wall in our kitchen that I've been wanting to do something with for a while now.  I saw an idea for using the small clipboards (Half the size of a regular 81/2x11 one) for chore charts on another blog somewhere, and had been looking for clipboards ever since with no luck.  When my mom showed me how to make mini clipboards at our family reunion this summer, I had a brilliant idea!  I made these little clipboards for each of the kids (I let them pick the paper/color they wanted), then put a transparancy over the top.  Once I printed out their chores on the computer, I slipped it under the transparancy.  Each day the kids mark off their chores with white board markers and I can just wipe them clean the next morning, ready to do all over again.  It has worked quite well so far.  Even Micah and Eli enjoy marking their charts by themselves.  I realize that I need to be better about follow through, and I'm also realizing other things that need to be added to their lists.  Next time I print them I am going to leave a blank line or two so I can add chores as the day needs (Ian doesn't need to take out the trash every day, but it is one of his chores). Anyways, I thought it was great that because our walls have the rounded corners, the magnet on the white board markers sticks to the corner of the wall.  That worked out rather well! lol
I love these new little additions in the kitchen, and my weird wall now has a purpose! :)

Wednesday, November 2, 2011

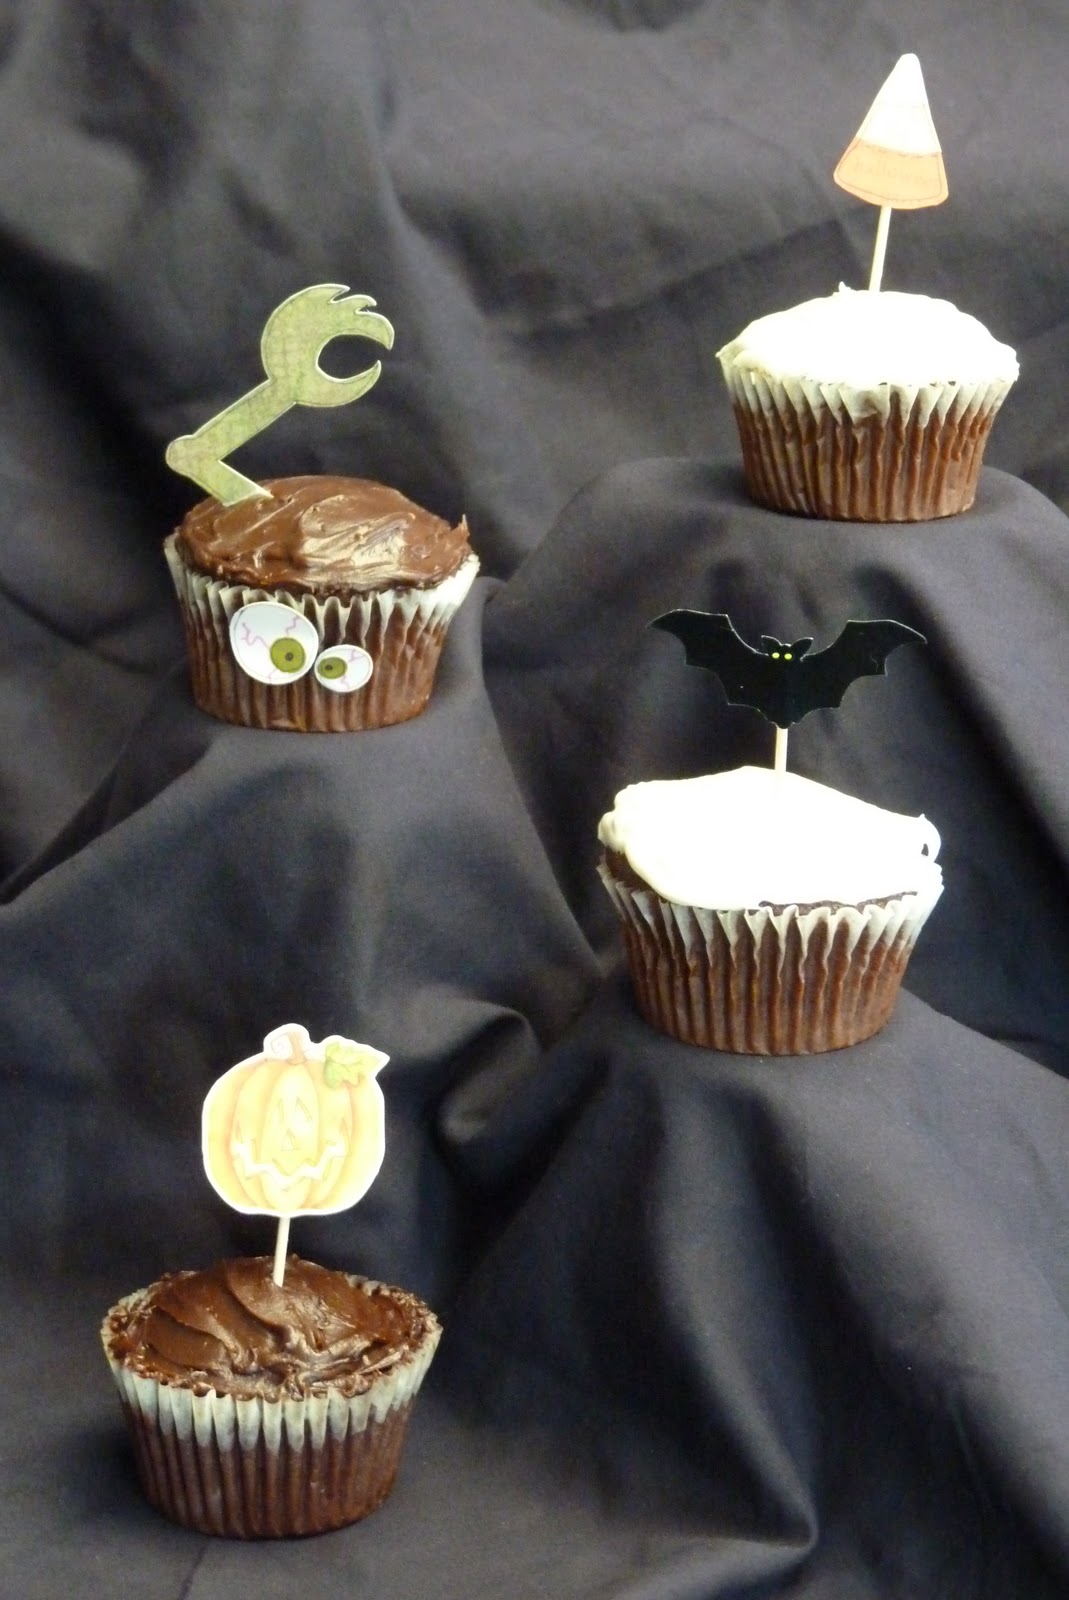
Cupcake Picks

I saw a picture online of some cute cupcake picks, but never made them up.  I printed out the picture, and I'm sad to say I don't remember where they came from so I can give due credit.  If these are yours, sorry!  They were too cute not to share.
These first two are made from some Halloween stickers I had in my stash.  I simply stuck them to cardstock, cut them out, and attached a toothpick.  So simple, right?  If you were doing a lot for a party, this might be the way to go.  Stickers are a great alternative if you don't have a lot of time, and all the cute work is done for you!
Sorry the bat is so hard to see--should have used a lighter background.
This candy corn is so easy to re-create.  You could easily use a die cut, but I drew up this pattern. A triangle with rounded corners (pattern included). Cut two of the triangles, one for the base, and cut one apart to use as a pattern for the yellow and orange pieces. Layer and glue, add black pen lines, and add a toothpick to the back.
This little guy is my favorite!  I'm including a pattern for his arm.  The eyes are four circle punches of varying sizes.  The smallest of mine was a regular hole punch.  A few pink squggley lines, and some glue to hook the circles together, and you have crazy eyeballs!  They are attached right to the cupcake liner. I outlined each piece with a fine-tipped black pen to make them stand out.   The monster arm is stuck right into the cake.  My kids thought this was the best cupcake and were fighting over who got to eat the monster. Lol  Happy baking and crafting!
The Monster and Candy corn patterns are areon Heather's blog.  Here's the link!

Monster Boxes

I saw some little monsters like these on the front of Cricut Magazine this month and thought I would try my hand at them. 
I started with a bunch of die-cut gift bags in assorted colors.  I die-cut mine at the school where my husband teaches, but you could also find a pattern online, or use Cricut's Tags, Bags Boxes and More Cartridge, and I've also seen some plain white ones at the Dollar Store in their Party Favor/Wedding Favor section.  Any die-cut gift bag will work.
To attach wings or horns, I used my self-healing mat and exacto knife and cut slits along the front edges of the box just long enough to slide my cut pieces in.
This is what the wings look like attached from the inside of the box.
These are horns and wings. 
I'm including patterns for my horns, wings (2 types), bellies, teeth, and mouths.  I used a variety of carstock pattern paper, textured paper, and cardstock to cut these pieces with.  Just remember when cutting wings/horns that the stiffer carstock-type paper works best/  I used googly eyes of different sizes.  I found a bag at the dollar store that had 3 sizes in it of about 100 eyes.  Really the sky's the limit when creating these little monsters.  Alternate the pieces to create different looking monsters! 
Cyclops

Fuzzy paper and scalloped scissor circle (You could also use a flower punch)

Add a ribbon bow and eyelashes to create a girl monster.  I also turned the horns upside down.

Velvet paper

Textured paper

Mulberry paper
These would be great for a kid's school class party filled with treats.  I'm going to use mine for my Halloween Piano Group treat! (They loved them, by the way.)  Happy Crafting, and get creative!

The patterns for wings, teeth, bellies, etc. are on Heather's blog.  Click the link below to get to them!
http://smallfryandco.blogspot.com/2011/10/little-monster-bags.html

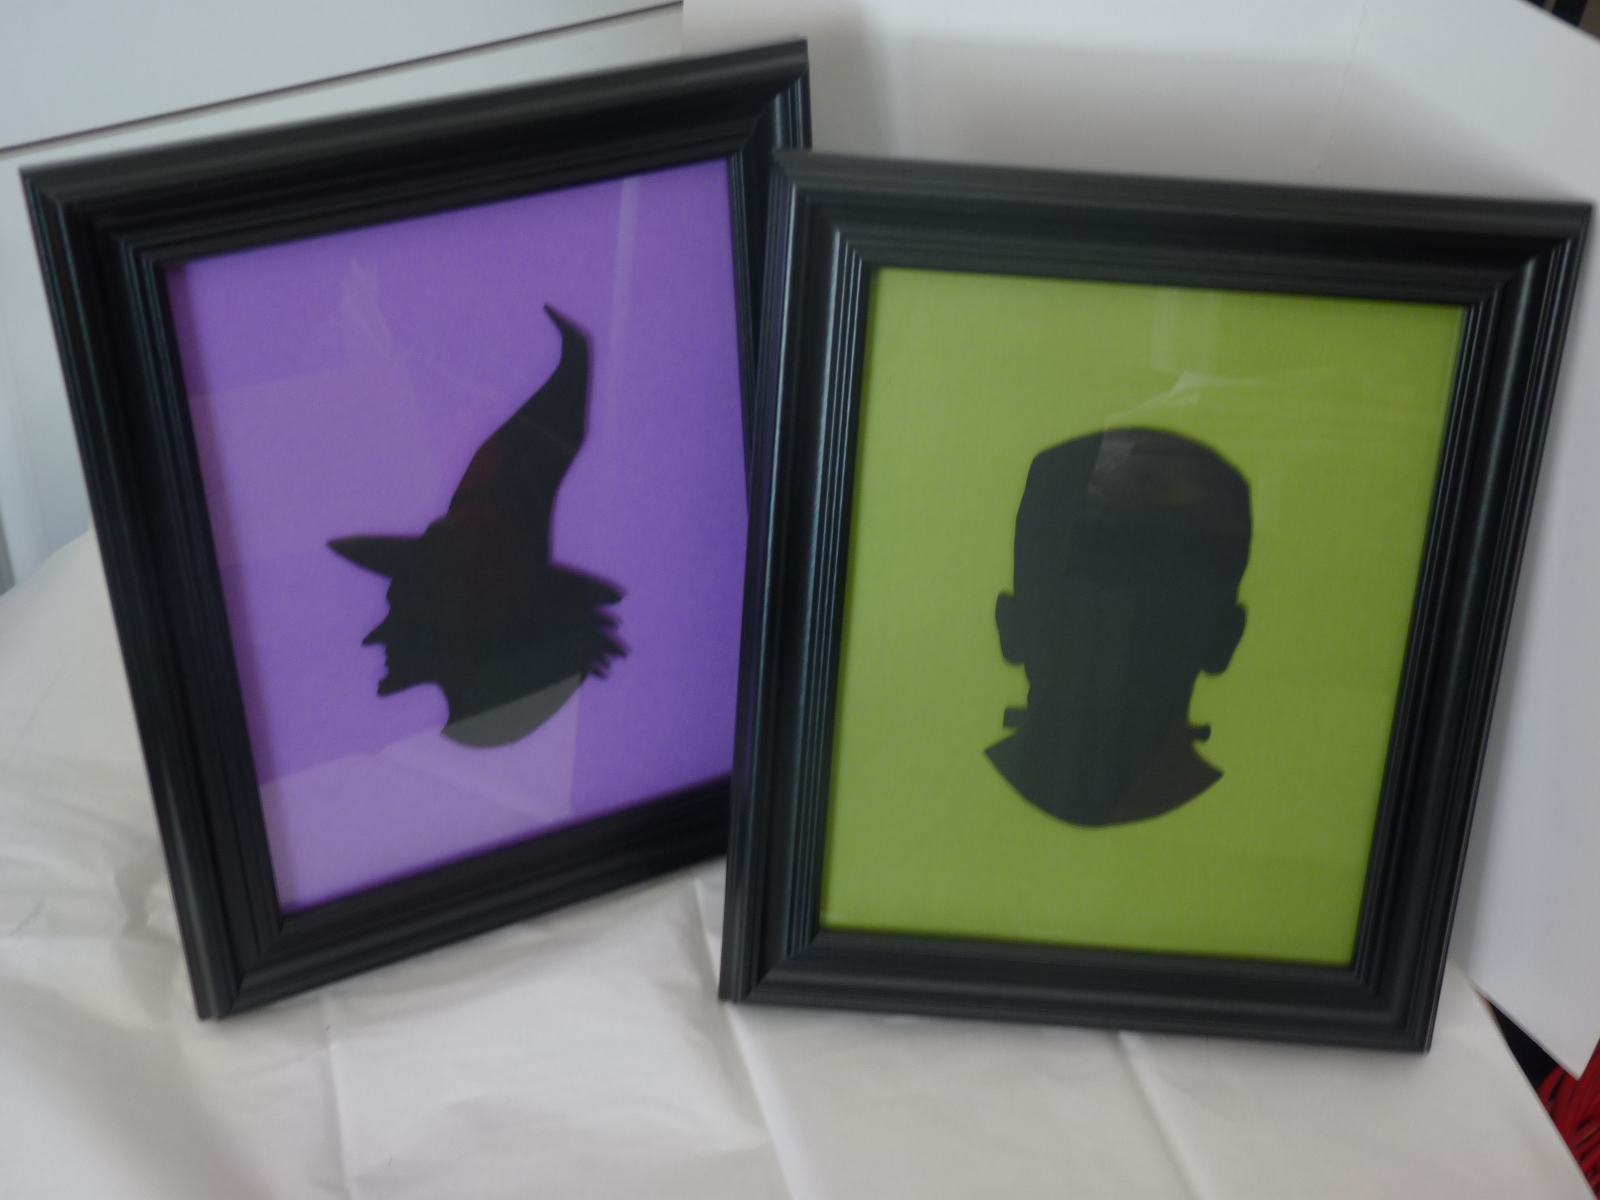
Halloween Silhouettes

Silhouettes are an in thing right now, and Halloween Silhouettes are so easy to create!  I just googled Halloween Silhouettes and a whole plethera of images came up.  This is where I got the witch from.  I couldn't find a good Frankenstein, so I googled it.  I couldn't find a sihlouette, so I improvised and just used a picture of one.  I knew I wanted this one straight on so the bolts in his neck would show.  I printed my images on black cardstock.  Keep in mind that you will be using the back side so the printer ink will not show.  Your image will be reversed.
Once I had my images printed, I cut them out with a pair of sharp scissors.

Flip them over so the printer ink does not show.
I then hooked them to my colored carstock using pop-up squares or dots.  This will make your images stand up off the paper just slightly so it adds dimension.  (I could have just printed my witch sihlouette onto my colored cardstock framed it and called it good, but I wanted the extra dimension the pop-ups give it. 
Frame them and display as aa Halloween decoration in your home!  This project is so easy and seriously took me about an hour from googling the images to being put in the frames.  Happy crafting!

Witch Boot


I saw this cute idea for a witch boot made out of a high heel shoe pattern on Good Things Utah and had to try it.  My sister, Cassy, was able to locate a pattern for me from the lady that was on the show.
I cut out two of the pattern so that the inside of my shoe had a design. Remember to turn one of them over so you can glue wrong sides together. This is not necessary if you want just a solid black shoe. 
I used some spray adhesive to glue my two pieces together, then scored all the lines and folded them.
Glue the shoe together.
My sister made these up and used a roll of lifesavers to look like the witch's leg.  In order for it to stand up, you need to cut out a 1 in. sqare piece in the heel of the shoe. leaving the tabs in place.   Add a buckle and some ribbon to the toe of the shoe.
Cover your lifesavers with a piece of striped pattern paper and insert into the heel of your shoe.

Fill with candy for a cute party favor or gift!


If you want the pattern, Heather uploaded it on her blog.  Click on the link to get it.

Halloween Tags

I helped my friend Heather out on her blog again with some Halloween craft tutorials.  I'm going to post them here, even though it's past Halloween by a couple days. :)  Sorry, still trying to get my blog all caught up--I'm getting there!  As a result of posting them on Heather's blog, this post of my Halloween Tags got linked to a couple of other sites.  Kind of fun!  Here are the links for those:
and
Enjoy! :)

I came up with the idea for these cute Halloween tags when I was teaching scrapbook classes at Paper Daisy in Orem.  They are  a great way to use up all those little scraps of cardstock you are holding on to!  To start, you will need 5 tags in these colors--two peach, one black, one green, and one orange. My tags are 3 in. x 1 1/2 in., but you could easily use any die cut tag you have.
Here is what you will need for all the tags.  I did one picture instead of lots of pictures of tiny pieces.  I'll tell what you need for each tag as I give instructions.
Here are the finished tags!  So cute, and super easy to do!
Frankenstien:
Supplies: 1 green tag, one black tag, zig zag or grass craft scissors, one black eyelet, two mini black brads, one gray strip 1/4 in. x 2 in., some pink chalk, and glue.
Take the black tag and cut with the craft scissors just above half of the black tag.  This piece becomes frank's hair.  Adhere hair to the green tag, then add the eyelet to the hole. (The eyelet isn't absolutely necessary, but adds a more finished look.)  Put your brads through the tag, creating eyes.  Adhere the gray strip to the back of the tag, creating the bolts in his neck.  Add some pink chalk to his cheeks and he is done!

Pumpkin:
Supplies: 1 orange tag, one orange eyelet, two mini black brads, 1 leaf punch, green cardstock, orange chalk
Take the Orange tag and add the eyelet.  Chalk ridges into your pumpkin using a slightly darker chalk than the tag color. Punch a leaf out of the green cardstock and adhere to tag.  Add mini brads for eyes.

Mummy:
Supplies: 1 peach tag, 2- 6 in. strips of gauze cut in half the long way (you should have 4 skinny pieces total), 1 white eyelet, 2 black mini brads, pink chalk
Take the peach tag and begin wrapping it with the gauze.  I only used 3 of the four strips so it wasn't too bulky and some of the peach tag could show through the gauze.  Make sure your tag is fully covered on  the front side.  Add your white eyelet.  Add the mini brad eyes.  Chalk his cheeks.

Witch:
Supplies: 1 peach tag, 1 black eyelet, 2 mini black brads, black cardstock, orange cardstock strip1/4 in. x 1 1/2 in., black cardstock strip 1/4 in. x 2 in., 6-2 in. pieces black baby ric rac
Take the peach tag and trace the top of the tag onto black cardstock making it come to a point.  This will be your hat.  Cut it out and adhere to peach tag.  Add the eyelet to the top of her hat.  Adhere the orange strip to create the band of the hat.  Glue the ric rac to the edge of hat, then add the black strip to create the brim of the hat.  Add the mini brads for her eyes.  Chalk her cheeks.

Black Cat:
Supplies: 1 black tag, black eyelet, 2 mini black brads, purple cardstock cut into a small triangle, 3 strands of black DMC floss cut to 3 in. in length, mini hole punch or needle, white gel pen
Take the black tag and add the eyelet.  Add the mini brads for eyes and glue purple triangle underneath for the nose.  Draw a line down from the nose for a mouth using the gel pen.  Using a mini hole punch or a needle, punch 3 holes on each side of the nose for whiskers.  Thread the DMC floss through one side of the cheek, and out the other.  Glue on the back to hold in place.  Repeat for other 2 strands of floss.

I used my tags as an embellishment on this halloween scrapbook page, but if you wanted to use them as gift tags, simply cut another tag out of the same background color and glue to the back of your halloween tag.  This will finish it off, hiding the backs of your brads, glue, etc., and give you someplace to write!  Add a ribbon through the eyelet at the top and you have a cute tag to add to a halloween treat!

Saturday, January 8, 2011

Birthday Card Week is Coming to an End

Today is my last guest appearance over at my friend and neighbor's craft blog, Small Fry and Co.  It was fun to be part of birthday card week, and I think my friend was far too generous with her compliments of me. :)  On the other hand, she made me sound like wonder woman, so, thanks for that Heather! LOL  Go to her blog to see the tutorial, or just enjoy my two cute cards pictured here! :)  Thanks for letting me be a part of Birthday Card Week on your blog Heather.  It was a lot of fun--we'll have to do it again sometime!

Thursday, January 6, 2011

Birthday Card week My #2

Birthday card week is in full swing over at Small Fry and Co.  My second card is on her blog today.  For the tutorial go to my friend Heather's blog  And again, if you don't want the tutorial, here is a picture of my card.  Happy crafting!

You Might Also Like

Related Posts Plugin for WordPress, Blogger...